[Lane Detection]OpenCV기반 차선인지1
Lane Detection이란?
차선인지에도 다양한 방법이 있지만 크게 1) OpenCV기반 차선인지(왼쪽) 2) 딥러닝 기반 차선인지(오른쪽)
다음과 같은 방식으로 나눌 수 있습니다.
본 포스트는 1) OpenCV기반 차선인지에 대한 포스트이며, 향후 (2)에 대해서도 포스트를 올릴 예정입니다 ㅎㅎ
Lane Detection Pipline
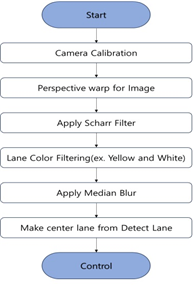
1. Camera Calibration
처음으로 진행하는 카메라 캘리브레이션은 이전 포스트에서 다루어서 아래 포스트로 대체하겠습니다!!
카메라 캘리브레이션(Camera Calibration)
1. 카메라 캘리브레이션이란? - 간단하게는 카메라의 파라미터(parameters)를 추정하는 과정을 카메라 캘리브레이션이라고 합니다. 우리가 보는 실제세계는 3D와 Camera로 캡처한 이미지 2D(픽셀)간의
play2-gound.tistory.com
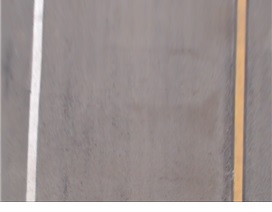
2. Perspective Warping
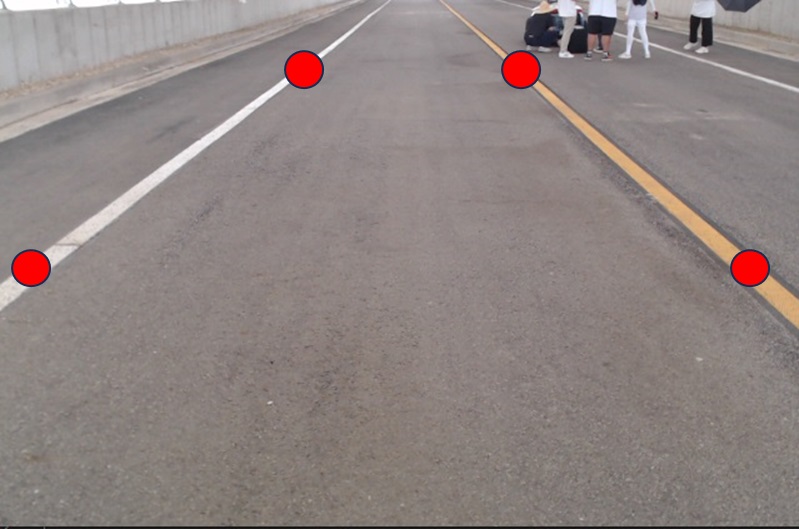
카메라 캘리브레이션 과정을 거친 후, 차선의 상태를 더 잘 파악하기 위해서 Perspective warping(원근 변환)을 진행합니다.
변환 전에는 차선 이외에 노이즈가 많고 곡률을 파악하기 어렵습니다.
def bird_eye_view(self, frame):
# set ROI
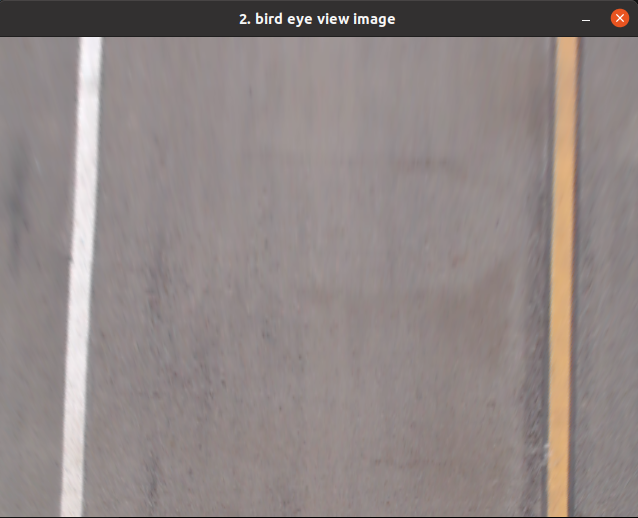
pts = np.float32([[0, 0], [0, y_size], [x_size, 0], [x_size, y_size]])
matrix = cv2.getPerspectiveTransform(self.RoI, pts) #위 사진처럼 이미지 변환을 위한 함수
matrix_inv = cv2.getPerspectiveTransform(pts, self.RoI) # 이후 최종 이미지를 되돌리때 사용
frame = cv2.warpPerspective(frame, matrix, (x_size, y_size))
# Adding Center ROI
x, y = x_size, y_size간단하게 위 사진처럼 빨간 점 4개를 self.RoI에 2중 리스트로 생성하여 cv2.getPerspectiveTransform 함수에 넣으면 변환행렬을 구할 수 있다. 해당 행렬로 cv2.warpPerspective 함수에 이미지, 행렬, 윈도우 사이즈를 넣어 실행하면 변환된 이미지를 확인 할 수 있습니다.
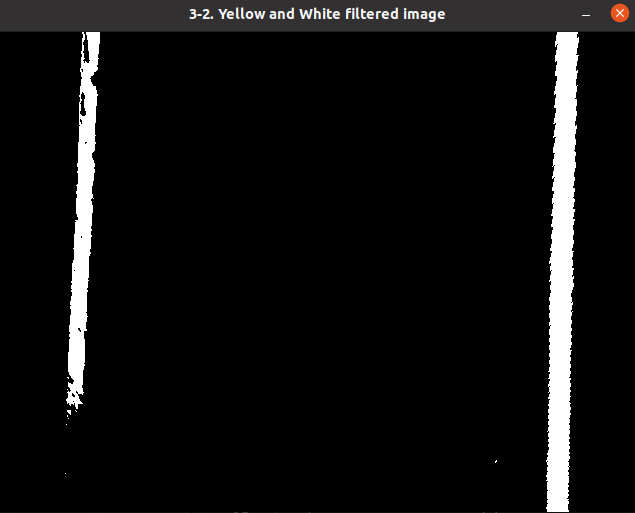
3. Scharr Filter / Lane Color Filtering
해당 과정은 차선과 주변환경을 구분하고 노이즈를 제거하여 이후에 진행될 과정에서 오류를 줄이기 위한 과정이다.
아래 코드를 통해 X,Y 축에 대한 편미분 과정이라고 볼 수 있습니다.
def scharr_filter(self, frame):
        img_gray = cv2.cvtColor(frame, cv2.COLOR_BGR2GRAY)

        # scharr x,y filtering for gradient detection
        img_scharr_x = cv2.Scharr(img_gray, cv2.CV_64F, 1, 0)
        img_scharr_x = cv2.convertScaleAbs(img_scharr_x)
        img_scharr_y = cv2.Scharr(img_gray, cv2.CV_64F, 0, 1)
        img_scharr_y = cv2.convertScaleAbs(img_scharr_y)

        # scharr x, y = scharr x + scharr y
        img_scharr = cv2.addWeighted(img_scharr_x, 1, img_scharr_y, 1, 0)

        _, white_line = cv2.threshold(img_scharr, 150, 255, cv2.THRESH_BINARY)
        return white_line
def yellow_and_white_filter(self, image):
"""
Filter the image to include only yellow and white pixels
"""
lower_white = np.array([170, 170, 160])
upper_white = np.array([250, 250, 245])
white_mask = cv2.inRange(image, lower_white, upper_white)
white_image = cv2.bitwise_and(image, image, mask=white_mask)
# Filter yellow pixels
hsv = cv2.cvtColor(image, cv2.COLOR_BGR2HSV)
lower_yellow = np.array([10, 40, 100])
upper_yellow = np.array([23, 255, 255])
yellow_mask = cv2.inRange(hsv, lower_yellow, upper_yellow)
yellow_image = cv2.bitwise_and(image, image, mask=yellow_mask)
out = cv2.bitwise_or(white_image,yellow_image)
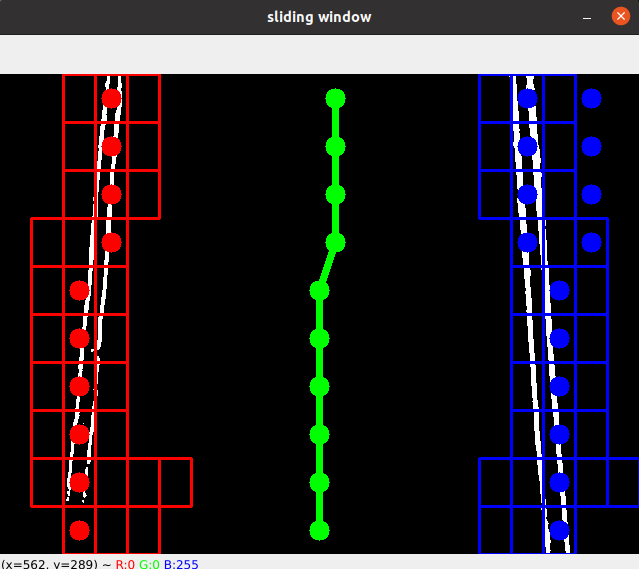
return white_image, yellow_image, out4. Center lane Path
해당 과정에서 노이즈를 제거한 이미지를 받아와서 진행을 합니다.
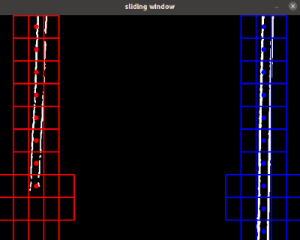
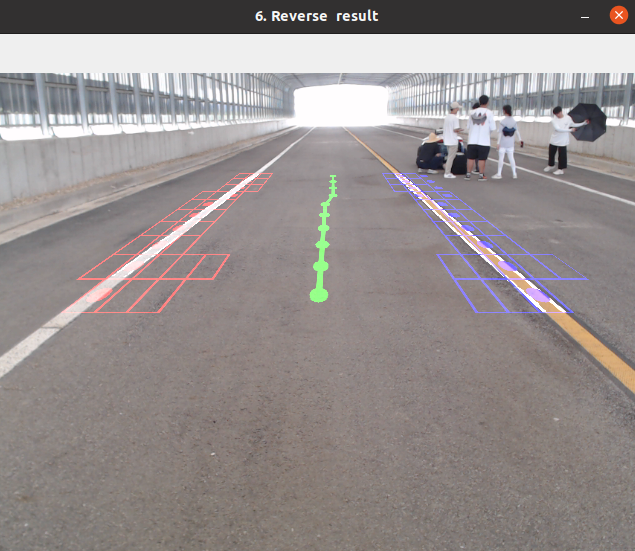
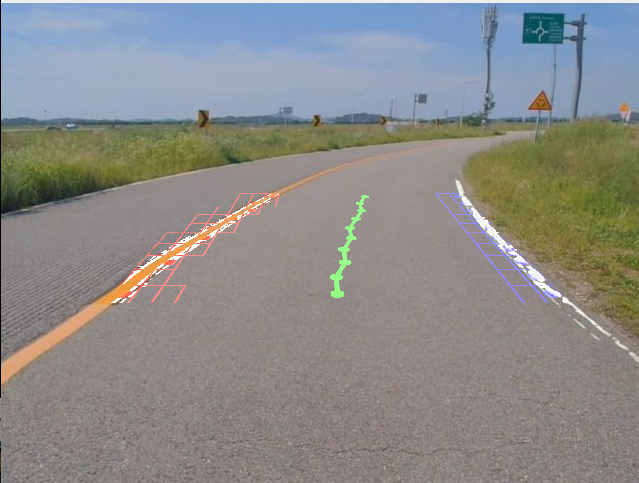
여기서 사용한 알고리즘은 Sliding Windows로 탐색기법입니다.
이를 통해서 이전에 차선의 연결성을 파악 할 수 있고 곡률이 심한 구간에서도 왼쪽/오른쪽 차선에 대한 흔들림을 보정 할 수 있습니다.

# searching point for sliding window
self.search_point = [0, 0]
def sliding_window(self, frame, search_point):
frame_color = cv2.cvtColor(frame, cv2.COLOR_GRAY2BGR)
# grid number
grid_x = 20
grid_y = 15
# grid number for searching
left_grid = 3
right_grid = 3
# search starting point of next frame
next_search = [0,0]
# grid size
margin_x = frame.shape[1] / grid_x #[1] = 640
margin_y = frame.shape[0] / grid_y #[0] = 480
# histogram of white pixel to get search starting point of left, right lane
histogram = np.sum(frame[:,:], axis=0)
# get midpoint of image and it become boundary of left and right lane
midpoint = int(histogram.shape[0]/2)
# search starting point from histogram
leftx_base = np.argmax(histogram[:midpoint])
rightx_base = np.argmax(histogram[midpoint:]) + midpoint
# if there are search points from previous frame,
# initialize starting point
if search_point[0] != 0 and search_point[0] < midpoint:
leftx_base = search_point[0]
if search_point[1] != 0 and midpoint < search_point[1]:
rightx_base = search_point[1]
# from leftx_base and rightx_base, get index of searching window
leftx_current = int(leftx_base/margin_x)
rightx_current = int(rightx_base/margin_x)
# list of lane point
left_line = []
right_line = []
# start searching lane from bottom of image to top
for grid in range(grid_y):
# white pixels of each window are calculated to score
left_score = []
right_score = []
# first, assume that there are no lane point
left_point_exist = False
right_point_exist = False
# search white pixel of left side of image
for left in range(left_grid):
left_p1 = (int(margin_x * (leftx_current + left - int(left_grid / 2))), int(margin_y * (grid_y - grid - 1)))
left_p2 = (int(margin_x * (leftx_current + left - int(left_grid / 2) + 1)), int(margin_y * (grid_y - grid)))
left_score.append(grid_score(frame, left_p1, left_p2)) # calculate white pixel score of each window and append it to list
cv2.rectangle(frame_color, left_p1, left_p2, self.red_color, 2) # draw window
# if there are no white pixel in left side
if np.max(left_score) == 0:
left_grid = 5 # set number of searching window of next frame to 5
# if there are white pixel in left side
else:
leftx_current = leftx_current - int(left_grid / 2) + np.argmax(left_score) # set searching point of upper window
left_grid = 3 # set number of searching window of next frame to 3
left_point_exist = True
# search white pixel of right side of image
for right in range(right_grid):
right_p1 = (int(margin_x * (rightx_current + right - int(right_grid / 2))), int(margin_y * (grid_y - grid - 1)))
right_p2 = (int(margin_x * (rightx_current + right - int(right_grid / 2) + 1)), int(margin_y * (grid_y - grid)))
right_score.append(grid_score(frame, right_p1, right_p2)) # calculate white pixel score of each window and append it to list
cv2.rectangle(frame_color, right_p1, right_p2, self.blue_color, 2) # draw window
# if there are no white pixel in right side
if np.max(right_score) == 0:
right_grid = 5 # set number of searching window of next frame to 5
# if there are white pixel in right side
else:
rightx_current = rightx_current - int(right_grid / 2) + np.argmax(right_score) # set searching point of upper window
right_grid = 3 # set number of searching window of next frame to 3
right_point_exist = True
# set left and right lane points
left_point = (int(margin_x * leftx_current + margin_x / 2), int(margin_y * (grid_y - grid - 1) + margin_y / 2))
right_point = (int(margin_x * rightx_current + margin_x / 2), int(margin_y * (grid_y - grid - 1) + margin_y / 2))
# if right_point and left point are close each other, choice one point that have more points before
if (right_point[0] - left_point[0]) < 200:
if len(left_line) < len(right_line):
left_point_exist = False
elif len(left_line) > len(right_line):
right_point_exist = False
if left_point_exist == True:
# draw left point
cv2.line(frame_color, left_point, left_point, self.red_color, 10)
if right_point_exist == True:
# left point O, right point O
cv2.line(frame_color, right_point, right_point, self.blue_color, 10) # draw right point
# if calculated left point is in range
if right_point[0] < x_size:
right_line.append(right_point) # append it to list
else:
# left point O, right point X
# assume that left lane is curved lane, and reinforce searching of left lane
left_grid = 5
# if calculated left point is in range
# add) right_line X pred_point
if left_point[0] > 0:
pred_right_point = (left_point[0]+480,left_point[1])
right_line.append(pred_right_point)
left_line.append(left_point) # append it to list
else:
if right_point_exist == True:
# left point X, right point O
# assume that right lane is curved lane, and reinforce searching of right lane
right_grid = 5
cv2.line(frame_color, right_point, right_point, self.blue_color, 10) # draw right point
# if calculated right point is in range
# add) left_line X pred_point
if right_point[0] < x_size:
pred_left_point = (right_point[0]-480,right_point[1])
left_line.append(pred_left_point)
right_line.append(right_point) # append it to list
# lane points of second window from bottom of image are saved to help next frame to set searching point
if grid == 1:
if left_point_exist == True:
next_search[0] = left_point[0]
if right_point_exist == True:
next_search[1] = right_point[0]
# 좌우 차선 점을 그립니다.
for point in left_line:
cv2.circle(frame_color, point, 10, (0, 0, 255), -1) # 왼쪽 차선은 빨간색
for point in right_line:
cv2.circle(frame_color, point, 10, (255, 0, 0), -1) # 오른쪽 차선은 파란색
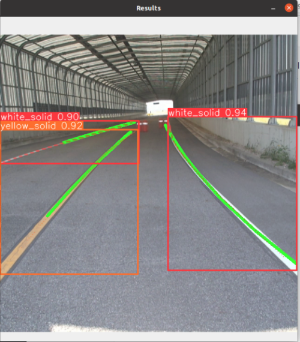
# 좌우 중앙선을 계산하여 그립니다.
center_line = []
for left_point, right_point in zip(left_line, right_line):
print(left_point[0])
center_x = (left_point[0] + right_point[0]) // 2
center_y = left_point[1] # 또는 right_point[1], 양쪽 차선 높이는 대략 같을 것입니다.
center_line.append((center_x, center_y))
for center_point in center_line:
cv2.circle(frame_color, center_point, 10, (0, 255, 0), -1) # 중앙선은 녹색
#아래는 PID제어 부분이라 제외하였습니다.
#if len(center_line) > 1:
# cv2.polylines(frame_color, [np.array(center_line)], isClosed=False, color=(0, 255, 0), thickness=5)
#
#current_steering = -int(math.atan2((2 * self.vehicle_length * math.sin(self.offset)), self.lfd) * 71)
return frame_color, left_line, right_line, next_search
*Perspective Warping 역변환 (시각화용 필수 X)
다음에는 차선인지부분을 딥러닝 적용한 YOLOv8을 활용한 포스트로 돌아오겠습니다.
혹시 궁금하신점이 있다면 언제든 환영합니다 ㅎㅎ